 Skip to main content


You have the source code of Order Webhook for n8n. This guide takes it from the zip file to a published order webhook on your own computer: it only accepts calls that send your secret key, checks every order, saves the good ones in an n8n data table, and answers each caller with the saved order or a list of what to fix.
By the end, the Order webhook is published, and the Orders table holds your first test order.
Cost: free. Everything runs on your own computer, with no accounts or API keys. n8n’s Community Edition costs nothing to self-host. Docker Desktop (opens in a new tab) is free for personal use, education and small businesses (fewer than 250 employees and less than $10 million in yearly revenue); larger companies need a paid Docker subscription.
Every screen and output on this page is real, run with n8n 2.48.7 and Docker Desktop on macOS.
Get the Source Code
Get the complete source code of Order Webhook for n8n on Dewiride Store → (opens in a new tab)
The archive holds the two workflows and the Docker Compose file this guide sets up and runs.
Prerequisites
- Docker Desktop (opens in a new tab), installed and running.
Step 1: Unzip the Source Code
Open Terminal and go to the folder that holds the zip, such as Downloads:
cd ~/Downloads
Unzip it:
unzip order-webhook-n8n-1.0.0.zip
It creates a folder named order-webhook-n8n. Go into it:
cd order-webhook-n8n
The folder holds the two workflows in workflows, compose.yml for n8n, .env.example with two optional settings, and a README.
Step 2: Start n8n
Already run n8n 2? Skip to Step 4 and import the workflows into your own n8n.
compose.yml runs n8n 2.48.7 in Docker, reachable only from your computer. Start it:
docker compose up -d
docker compose reads compose.yml in this folder, and up -d starts n8n in the background. If the n8n image isn’t on your computer yet, Docker downloads it first. When the last line says Started, n8n is running:
Volume order-webhook-n8n_n8n_data Created
Network order-webhook-n8n_default Created
Container order-webhook-n8n-n8n-1 Started
Step 3: Create Your Owner Account
Open http://localhost:5678 in your browser. The first time, n8n asks for an owner account: enter your email address, name and a password, and click Next.

n8n then shows a few questions and a free licence offer. Answer or skip them until n8n opens. How to Install n8n with Docker shows each of these screens.
Step 4: Import the Two Workflows
Import the setup workflow first. Click + at the top of the left sidebar, then New workflow. Click ⋯ next to the workflow name, then Import › From file, and choose set-up-orders-table.json in the workflows folder.

If n8n asks Importing this from an AI tool?, click Skip. It offers to connect AI tools to n8n, which this guide doesn’t need.

The workflow opens as Set up the Orders table. Now import order-webhook.json the same way, into a second new workflow. It opens as Order webhook:

New order takes the orders, Check the order checks each field, and Is the order valid? sends good orders to Save the order and Reply with the saved order, and the rest to Reply with the problems. The warning on New order means it has no key yet. Step 6 adds it.
Step 5: Create the Orders Table
Open Set up the Orders table and click Execute at the bottom of the canvas. n8n says Workflow executed successfully, and both nodes turn green:
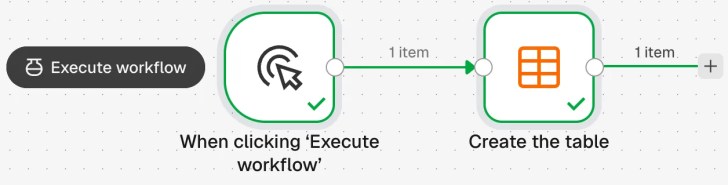
The Orders table now exists, with the columns customer, book and quantity.
Step 6: Add Your Secret Key
Every app that sends orders must send this key, so it’s what keeps strangers out. Make a long random one in Terminal:
openssl rand -hex 32
It prints a line of 64 random characters: that’s your key. Copy it, and keep it out of chats, code and screenshots.
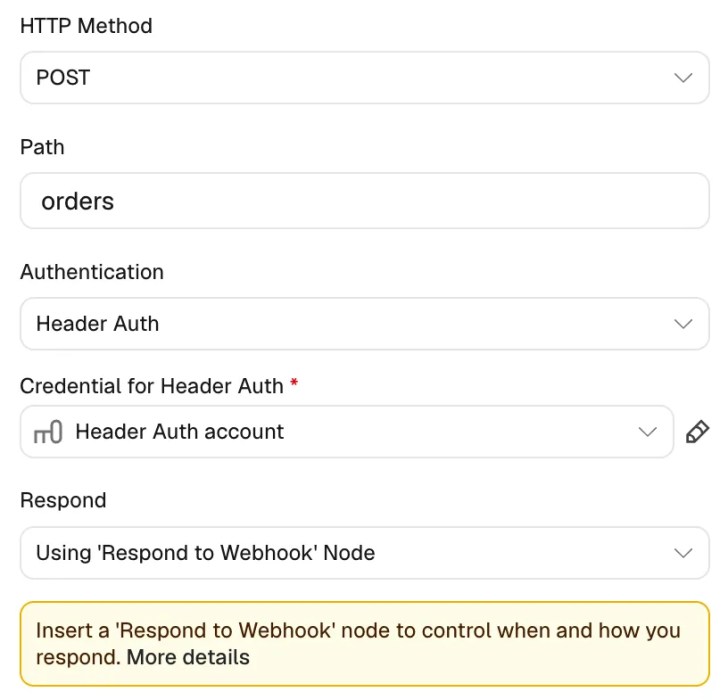
Open Order webhook and double-click New order. Under Credential for Header Auth, click Connect to Header Auth:

Set Name to X-API-Key and paste your key into Value. n8n shows it as dots:
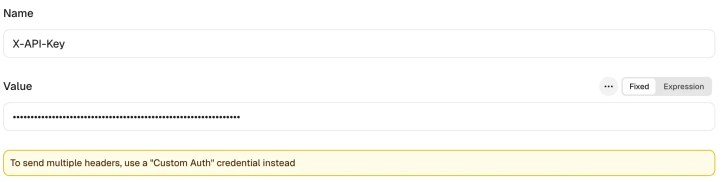
Click Save at the top right of the dialog. The node now uses the new credential, Header Auth account:
How to Secure an n8n Webhook with Header Auth explains how the key check works.
Step 7: Publish the Order Webhook
Close the node, click Publish, then Publish in the dialog:

From now on, http://localhost:5678/webhook/orders takes orders.
Step 8: Send a Test Order
Send an order from Terminal, with your key in place of YOUR_KEY. -X POST sends a POST request, each -H adds a header, and -d holds the order as JSON:
curl -X POST http://localhost:5678/webhook/orders \
  -H "X-API-Key: YOUR_KEY" \
  -H "Content-Type: application/json" \
  -d '{"customer":"Asha Rao","book":"A Map of Quiet Places","quantity":2}'
The webhook answers with the saved order and its id:
{"customer":"Asha Rao","book":"A Map of Quiet Places","quantity":2,"id":1,"createdAt":"2026-11-21T15:02:07.493Z","updatedAt":"2026-11-21T15:02:07.493Z"}
Now send an order with no customer and a quantity of 0:
curl -X POST http://localhost:5678/webhook/orders \
  -H "X-API-Key: YOUR_KEY" \
  -H "Content-Type: application/json" \
  -d '{"book":"Salt and Starlight","quantity":0}'
Nothing is saved, and the reply says what to fix:
{"error":"The order was not saved.","problems":[{"field":"customer","message":"Send the name of the customer as text."},{"field":"quantity","message":"Send a whole number from 1 to 100."}]}
Open Overview › Data tables › Orders to see every saved order. Here a second good order, from Ravi Menon, was sent as well:
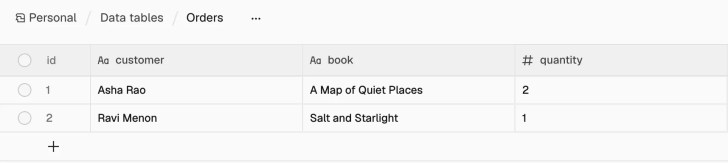
Change the Checks
The limits are at the top of the code in Check the order: MAX_QUANTITY (100), MAX_CUSTOMER_LENGTH (100) and MAX_BOOK_LENGTH (200). To change one, double-click the node, edit the number, close the node and publish again.
Clean Up
To stop n8n, run this in the folder:
docker compose down
It stops n8n and removes its container:
Container order-webhook-n8n-n8n-1 Removed
Network order-webhook-n8n_default Removed
Your workflows, your key and the orders stay in Docker’s n8n_data volume, so docker compose up -d brings everything back.
Warning: docker compose down -v also deletes the volume, with every workflow, key and order in it. It can’t be undone.
Troubleshooting
| Problem | Cause | Fix |
|---|---|---|
Authorization data is wrong! | The call has no X-API-Key header, or its value isn’t your key | Send the header with the exact key from Step 6 |
{"message":"Error in workflow"}, and the run shows Data table with name "Orders" not found | The Orders table is missing | Run Set up the Orders table (Step 5) |
The requested webhook "POST orders" is not registered. | The Order webhook isn’t published | Publish it (Step 7) |
Cannot POST /webhook/orders right after docker compose up -d | n8n is still starting | Wait until docker compose logs shows Editor is now accessible via, then send the order again |
port is already allocated when n8n starts | Another app uses port 5678, such as another n8n | Stop it, or run echo "N8N_PORT=5701" >> .env to use port 5701. Then run docker compose up -d --force-recreate (why it’s needed). |
FAQ
Can I use my own n8n instead?
Yes, if it runs n8n 2. Skip Steps 2 and 3 and import the two workflows into it. They were tested with n8n 2.48.7.
How do my apps send orders?
Like the command in Step 8: a POST request to http://localhost:5678/webhook/orders with the order as JSON and your key in the X-API-Key header. The README lists the rules for each field and every reply.
Can the Orders table show times in my time zone?
Yes. Add a line such as GENERIC_TIMEZONE=Asia/Kolkata, with your own time zone, to a file named .env in the folder, and run docker compose up -d again. Replies still give times in UTC.
Does it work on Windows and Linux?
It has been tested on macOS so far.
Conclusion
You took the Order Webhook from its zip to a published webhook: n8n running in Docker, the two workflows imported, the Orders table created, your key in place and the Order webhook published. It now saves every good order and tells every caller what to fix in a bad one.
To see how a webhook like this is built, Part 4 of the n8n Tutorial builds the first version step by step.
Additional Resources
- Webhook node (opens in a new tab) (n8n docs)
- Respond to Webhook (opens in a new tab) (n8n docs)
- Data table node (opens in a new tab) (n8n docs)
- Export and import workflows (opens in a new tab) (n8n docs)
- docker compose up (opens in a new tab) (Docker docs)
Related
- n8n Tutorial — Part 4: Webhooks: Start a Workflow from Any App
- How to Secure an n8n Webhook with Header Auth
- How to Send a Custom Response from an n8n Webhook
- How to Install n8n with Docker
n8n, Docker and other names mentioned are trademarks of their respective owners. JD Bots isn’t affiliated with or endorsed by n8n GmbH or Docker, Inc.


0 comments