 Skip to main content


An n8n webhook is a web address that starts a workflow. Any app that can send a web request, such as an online shop, a form service or your own code, can call it and hand over its data, and n8n can answer straight back.
In this part you start an n8n workflow from outside n8n with the Webhook node. You build an order webhook for a small bookshop: each order the shop sends is saved in a data table, and n8n replies with the saved order. You test it with the Test URL, publish it, switch to the Production URL, and see why a webhook has both.
This is Part 4 of the n8n Tutorial. The parts in Module B, Workflow Basics:
- Part 3: Run a Workflow on a Schedule
- Part 4: Webhooks: Start a Workflow from Any App (you are here)
- Part 5: Forms: Collect Data with n8n Forms
- Part 6: Credentials: Connect n8n to Your Apps
- Part 7: Executions, Debugging and Pinned Data
- Part 8: Organise Your Workflows
All parts of the n8n Tutorial
Module A: Start Here
Module B: Workflow Basics
- Part 3: Run a Workflow on a Schedule
- Part 4: Webhooks: Start a Workflow from Any App
- Part 5: Forms: Collect Data with n8n Forms
- Part 6: Credentials: Connect n8n to Your Apps
- Part 7: Executions, Debugging and Pinned Data
- Part 8: Organise Your Workflows
Module C: Working with Data
- Part 9: Items and JSON: How Data Moves in n8n
- Part 10: Expressions: Use Data from Earlier Nodes
- Part 11: Transform Data
- Part 12: Filter and Compare Data
- Part 13: Dates and Times
- Part 14: Files: CSV, Excel and PDF
- Part 15: Data Tables: Store Data Inside n8n
Module D: Flow Logic
- Part 16: If and Switch: Make Decisions
- Part 17: Merge: Combine Branches
- Part 18: Loops and Batches
- Part 19: Wait and Human Approval
- Part 20: Sub-workflows
- Part 21: Error Handling
Module E: Code and APIs
- Part 22: HTTP Request: Call Any API
- Part 23: The Code Node in JavaScript
- Part 24: The Code Node in Python
Module F: AI with Claude
- Part 25: Your First AI Agent
- Part 26: Give Your Agent Tools
- Part 27: Memory That Lasts
- Part 28: Answer from Your Documents
- Part 29: AI Chains: Summarize, Classify and Extract
- Part 30: Human in the Loop and Guardrails
- Part 31: MCP in n8n
- Part 32: Evaluations: Test Your AI Workflows
- Part 33: Free Local AI with the Self-Hosted AI Starter Kit
- Part 34: An n8n Agent in Microsoft Teams
Module G: Connect Apps and Extend n8n
- Part 35: Connect Popular Apps with OAuth2
- Part 36: Community Nodes
- Part 37: Build Your Own Node
- Part 38: Programmatic Nodes and Publishing
- Part 39: The n8n API and CLI
- Part 40: Build Workflows in Code with the Workflow SDK
Module H: Self-Hosting for Production
- Part 41: Configure n8n with Environment Variables
- Part 42: Run n8n on PostgreSQL
- Part 43: Queue Mode and Workers
- Part 44: Task Runners and Security
- Part 45: Back Up, Restore and Update n8n
- Part 46: Logs, Metrics and Tracing
- Part 47: Put n8n Online with HTTPS
Module I: Users and Administration
- Part 48: Users, Roles and Two-Factor Authentication
Module J: n8n Cloud
- Part 49: Start an n8n Cloud Free Trial
- Part 50: AI Workflow Builder, Assistant and Gateway Credits
Module K: Wrap-up
- Part 51: Final Project, Cheat Sheet and What to Learn Next
Cost: free. Everything here runs on your own n8n Community Edition.
Every command, screen and output on this page is real, run with n8n 2 in Docker on macOS.
Get the Source Code
Get the complete source code of Order Webhook for n8n on Dewiride Store → (opens in a new tab)
It’s the finished, tested version of this part’s order webhook, with a secret key, a check on every order, clear replies, a one-click table setup and n8n in Docker.
What You’ll Build
An order webhook: a workflow at the address /webhook/orders that takes an order sent as JSON (customer, book and quantity), adds it to a data table named Orders, and replies with the saved order and its new id. You send the orders from the terminal with curl, the way a shop’s website would. You start from n8n running on your computer.
Prerequisites
- Part 3: Run a Workflow on a Schedule, the previous part of this tutorial.
- n8n running, signed in as its owner.
Step 1: Create the Orders Table
Create a data table named Orders with three columns: customer and book of type string, and quantity of type number. How to Create a Data Table in n8n shows each click.

Step 2: Add a Webhook Trigger
Click + at the top of the left sidebar, then New workflow, and name it New order webhook. Click Add first step, then On webhook call.
The Webhook node opens. Set HTTP Method to POST, the method apps use to send data, and replace the random Path with orders. Leave Respond at Immediately for now; Step 5 changes it.

At the top, Webhook URLs shows the address other apps call. It comes in two versions: the Test URL, http://localhost:5678/webhook-test/orders, for building and testing, and the Production URL for the published workflow (Step 7).
Step 3: Send a Test Order with curl
Click Listen for test event. n8n now waits for one call to the Test URL, for up to 120 seconds (n8n’s webhook docs (opens in a new tab)).
Open Terminal (press ⌘ Space, type Terminal and press Return) and send an order with curl, a tool for web requests that comes with macOS:
curl -X POST http://localhost:5678/webhook-test/orders -H "Content-Type: application/json" -d '{"customer": "Asha Rao", "book": "A Map of Quiet Places", "quantity": 2}'
In that command, -X POST sends a POST request, -H says the data is JSON, and -d is the order itself. n8n answers at once, because Respond is Immediately:
{"message":"Workflow was started"}
In n8n, the node’s OUTPUT shows what arrived: the request’s headers, the query parameters (none here), and the order itself under body.

Step 4: Save the Order in the Table
Close the panel. Add a Data table node after the Webhook, choose the Insert row action and pick Orders as the data table. Its three columns appear under Values to insert.
In the INPUT panel, open body and drag customer, book and quantity onto the columns with the same names. n8n turns each into an expression, such as {{ $json.body.customer }}, and shows the value from the test order under it.

Click Execute step. The row is saved, and the OUTPUT shows it with the id the table gave it. Testing this step writes a real row.

Step 5: Reply with the Saved Order
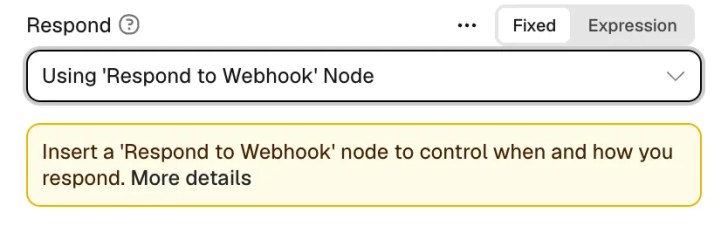
Close the panel and add a Respond to Webhook node after Insert row. This node sends the webhook’s answer. Keep Respond With at First Incoming Item: the answer is the row that the Data table node just saved.

The yellow note matters: the Webhook still answers on its own. Close the panel, open the Webhook node and set Respond to Using ‘Respond to Webhook’ Node, as n8n’s Respond to Webhook docs (opens in a new tab) describe.
Advertisement
Step 6: Test the Whole Workflow
Close the panel and click Execute workflow. The Webhook waits for a call to the Test URL:

Send a second order:
curl -X POST http://localhost:5678/webhook-test/orders -H "Content-Type: application/json" -d '{"customer": "Ravi Menon", "book": "Salt and Starlight", "quantity": 1}'
This time the answer comes from Respond to Webhook: the order as it was saved, with its id. createdAt is the time it was saved, in UTC (the Z at the end).
{"customer":"Ravi Menon","book":"Salt and Starlight","quantity":1,"id":2,"createdAt":"2026-11-21T13:38:12.157Z","updatedAt":"2026-11-21T13:38:12.157Z"}
All three nodes are green, each with 1 item:

Step 7: Publish and Use the Production URL
The Test URL only works while the editor listens. For apps to call your webhook at any time, publish the workflow: click Publish, then Publish in the dialog. n8n confirms it and explains where production calls show up:

Open the Webhook node and click Production URL. It’s the same address without -test:

Send a third order to it. There’s nothing to click first: a published webhook answers whenever n8n is running.
curl -X POST http://localhost:5678/webhook/orders -H "Content-Type: application/json" -d '{"customer": "Leela Iyer", "book": "A Map of Quiet Places", "quantity": 1}'
{"customer":"Leela Iyer","book":"A Map of Quiet Places","quantity":1,"id":3,"createdAt":"2026-11-21T13:40:29.036Z","updatedAt":"2026-11-21T13:40:29.036Z"}
Production runs don’t appear on the canvas. Close the panel and open the Executions tab: the newest run is the production call, and the runs with a flask icon were your tests.

Open the Orders table: the three orders are there, one per row.

Clean Up
Unpublish the workflow so the webhook stops answering, then archive and delete it from its ⋯ menu. Delete the Orders table from the Data tables tab, as the data table guide shows. Deleting either can’t be undone.
Common Mistakes
| Mistake | What happens | Do this instead |
|---|---|---|
| Calling the Test URL without clicking Listen for test event or Execute workflow first | n8n answers with a 404 error: the webhook isn’t registered | Click one of them, then call within 120 seconds |
| Giving another app the Test URL | It works for one call while you’re listening, then stops | Publish the workflow and give apps the Production URL |
| Leaving the random Path | The address ends in a long random ID | Set a short path, such as orders |
Troubleshooting
| Problem | Cause | Fix |
|---|---|---|
The requested webhook "orders" is not registered. (404) | The Test URL isn’t listening | Click Execute workflow and call again, or publish and use the Production URL |
The answer is {"message":"Workflow was started"} instead of the order | Respond is set to Immediately | Set Respond to Using ‘Respond to Webhook’ Node (Step 5) |
| A production call doesn’t show on the canvas | Production runs aren’t shown in the editor | Open the Executions tab |
FAQ
What’s the difference between the Test URL and the Production URL?
The Test URL answers only while the editor listens, for one call, and shows the data on the canvas. The Production URL answers whenever the workflow is published, and its runs appear in the Executions tab. n8n’s common issues page (opens in a new tab) compares the two.
Can apps on other computers call this webhook?
Not with a localhost address: localhost always means the computer the request comes from. To take calls from the internet, n8n has to run at a public address, which a later part of this tutorial covers.
How do I stop strangers from calling my webhook?
Set Authentication on the Webhook node. With Basic auth, Header auth or JWT auth, a call is accepted only when it carries the secret you set, as n8n’s Webhook docs (opens in a new tab) explain.
How much data can a webhook receive?
Up to 16 MB per call by default. On self-hosted n8n, the N8N_PAYLOAD_SIZE_MAX setting changes the limit (n8n’s Webhook docs (opens in a new tab)).
Conclusion
A webhook turns a workflow into an address other apps can call. You built one that saves each order and replies with it, tested it through the Test URL while building, and published it so the Production URL answers on its own. The same pattern works for any app that can send a web request: payments, form services, chat tools or your own code.
← Part 3: Run a Workflow on a Schedule
Coming next: Part 5: Forms: Collect Data with n8n Forms.
Additional Resources
- Webhook node (opens in a new tab) (n8n docs)
- Webhook workflow development (opens in a new tab) (n8n docs)
- Webhook common issues (opens in a new tab) (n8n docs)
- Respond to Webhook node (opens in a new tab) (n8n docs)
- Data table node (opens in a new tab) (n8n docs)
n8n and other names mentioned are trademarks of their respective owners. JD Bots isn’t affiliated with or endorsed by n8n GmbH.


0 comments